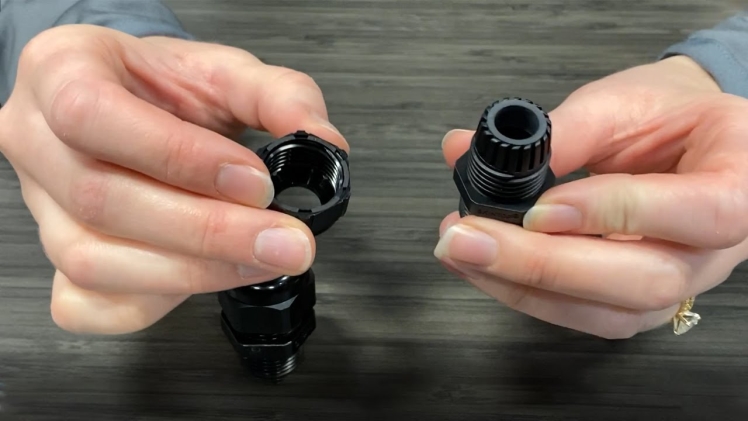
Before you start using a cord grip, you should have a pair of scissors, electrical tape, and/or a rod set. There are two common ways to use a cable gland. One involves using a rod set, while the other involves cutting a narrow piece of electrical tape. Well, we have discussed both of them below.
How Are Cord Grips Used?
Cord grips are relatively easy to use. Simply follow these steps:
- Start by cutting a piece of electrical tape. For best results, be sure to cut a narrow piece. After that, secure the piece you have cut over the cord’s end. You should do this to prevent the cloth covering from slipping or shifting off the internal wires.
- Next, get your cord grip and then unscrew it. Once you have done that, screw the cap portion of the piece over the tape as well as onto the cord.
- In the third step, get another piece of the cord gland and then bend back the prongs to prevent them from fraying or catching the cloth cord covering.
- The fourth step should be about screwing on the second piece of the cord gland. While doing this, make sure the prongs are facing the cord grip cap. This ensures that both pieces are fully on the cord.
- Last but not least, screw the pieces back together. Make sure they are around one inch away from your electrical tape. After that, move on to strip the end of the cord.
Besides, you can use a cable grip with a rod set. In this method, you need to consider the following steps:
- Get a rod and then start by screwing a cable grip attachment into one of its ends. After that, push the cable grip’s metal sock into one hand. Do this in a concertina movement.
- After creating a squashed grip, push the cable into it as far as you can.
- Next, pull the cable gland tight on the cable. To do this effectively, make sure one hand is on the cable and the other is on the end of the grip, which is closest to the rod. Remember that the harder you pull, the tighter the grip becomes.
- In the fourth step, pull the cable through the wall cavity using the cable gland. Continue to pull on the cable gland until the cable passes the wall cavity entirely.
- The last step under this method is about releasing the cable gland. To do this, push the cable gland back along the cable and away from you. In other words, do this in a similar fashion to when you were attaching the cable gland for the first time. When done correctly, the grip should loosen its hold to let you remove it from the cable effortlessly.
Why Use Cord Grips?
Cord grips come in handy for installing light fixtures. They are particularly useful in installing chandeliers and other heavier fixtures. By using a cable gland, you will be able to prevent cables and cords from being twisted loose or pulled away from walls and ceilings. Simply put, cord grips help you protect your cords and cables from damage or stress. Additionally, cable glands play a significant role in ensuring there are safe connection points that prevent arc flashes and sparks.
To conclude, There are different kinds of cord grips and, in most cases, each is suitable for different industries. Aluminum cord grips, for instance, are ideal for material handling, construction, automation, renewable energy, etc. Stainless steel cord grips, on the other hand, are perfect for lighting, transportation, maintenance repair operations, and more. Although the applications of cord grips vary, how you use them always remains the same.


