
Cutting sheet metal edging requires precision, efficiency, and the right tool. Whether working on automotive bodywork, HVAC ducts, roofing, or DIY metal projects, choosing the best cutting tool ensures clean edges and minimal material distortion. Each device serves a specific purpose depending on metal thickness, cut complexity, and desired finish, from manual hand tools like tin snips to power tools like angle grinders.
This article explores the best tools to cut sheet metal edging, provides a step-by-step guide on achieving clean, accurate cuts, and shares expert tips to enhance cutting efficiency and safety.
Common Tools to Cut Sheet Metal Edging
The right tool for cutting sheet metal edging depends on material thickness, precision requirements, and project scale. Below, we discuss the five commonly used tools for sheet metal edging.
Tin Snips
Tin snips function like heavy-duty scissors. They are particularly ideal for cutting thin sheet metal, such as aluminum or galvanized steel. Tin snips are manually operated, depending on the strength of the operator. Still, they are effective sheet metal edging solutions but may not be suitable for long or thick cuts.
They come in three types:
- Straight-cut snips for straight lines.
- Left-cut snips (red handles) for left curves.
- Right-cut snips (green handles) for right curves.
Angle Grinder
An angle grinder with a cutting disc is great for quick, straight cuts on thin to medium-thickness metal. While angle grinders are handheld power tools, unlike tin snips, they are versatile, suiting high-speed sheet metal cutting. However, it creates sparks that may result in potential heat buildup, requiring proper safety precautions. It is best used for stainless steel, aluminum, and structural steel.
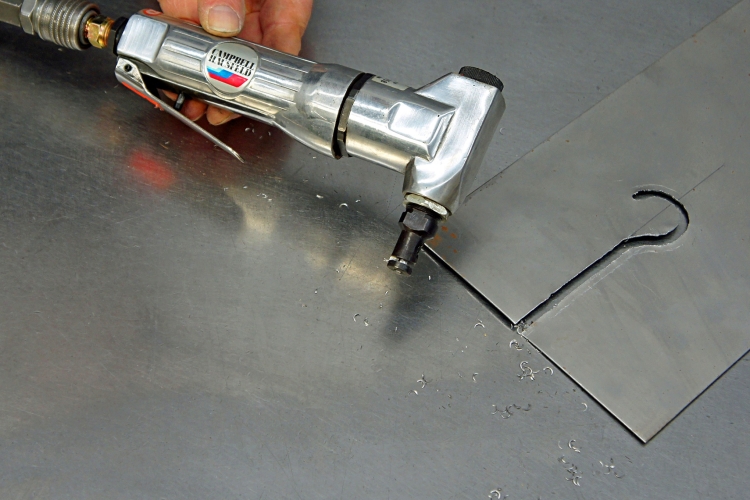
Jigsaw
A jigsaw with a metal-cutting blade allows for curved and intricate cuts in sheet metal edging. This sheet metal cutting tool is better suited for making non-linear intricate cuts and curved designs. It is particularly useful for custom HVAC ducts, roofing, and decorative metalwork designs. However, the machinist or operator must ensure adequate clamping of the metal sheet during cutting to reduce vibrations.
Nibbler
Nibblers punch through sheet metal, creating clean, distortion-free edges. They work well for cutting complex shapes without excessive force, making them perfect for automotive and electrical applications. While they make cuts with smooth surfaces, this tool generally produces small metal waste (chips) that must be cleaned up.
How to Cut Sheet Metal Edging
Achieving clean, precise cuts in sheet metal edging requires the right tools, proper preparation, and correct technique. Follow this step-by-step guide to ensure accurate and smooth results.
Step 1: Choose the Right Cutting Tool
The choice of tool depends on metal thickness and cut complexity. Below is a summary of the different cutting tools we discussed and their best use.
- Tin Snips: Best for thin sheet metal (aluminum, brass, or galvanized steel).
- Angle Grinder: Ideal for straight cuts on medium-thickness metal.
- Jigsaw: Suitable for curved or intricate cuts.
- Nibbler: Provides burr-free edges without warping.
Step 2: Mark the Cutting Line
Before cutting, use a marker, chalk, or scribe to outline the cut. Afterward, connect the line; use a ruler or metal guide for straight cuts. In contrast, when dealing with curved designs, trace them using stencils or a suitable template.
Step 3: Secure the Sheet Metal
After marking the cut, you must prepare the metal sheet for cutting. This involves clamping the workpiece to a sturdy workbench to prevent movement and reduce vibrations during cutting. If using a jigsaw or nibbler, ensure enough clearance for the tool to move freely. In addition, wear gloves and safety goggles to protect from sharp edges and sparks.
Step 4: Make the Cut
Once you are done with the pre-cutting operations, you can cut the workpiece.
Using Tin Snips (For Thin Metal)
Remember, a tin snip is like heavy-duty scissors. Start from one end and make slow, steady cuts along the marked line. Use left or right-cut snips for curves and corners.
Using an Angle Grinder (For Fast Straight Cuts)
Install an appropriate metal-cutting disc to your angle grinder. Afterward, hold the grinder firmly and guide it along the marked line, applying light pressure to effect cutting. However, avoid forcing it, as this can cause rough edges; instead, allow the disc to cut. You just offer guidance and minimal pressure.
Using a Jigsaw (For Intricate Cuts)
Fit the jigsaw with an appropriate toothed metal-cutting blade that suits your workpiece and the intended cut. Afterward, start cutting at a slow speed and gradually increase as needed. Use both hands for improved stability and follow the guide mark carefully to minimize inaccuracies.
Using a Nibbler (For Smooth Edges)
Position the nibbler at the starting point and guide it along the marked line. Move at a steady pace to prevent jagged cuts.
Step 5: Deburr and Smooth the Edges
Once you are done cutting, you can proceed to post-cutting operations. Use a file, sanding block, or grinding wheel to remove sharp edges. However, a deburring tool works best when working with thin sheet metal. You may apply a protective coating or paint if necessary to prevent corrosion.
Step 6: Inspect and Test the Cut
Ensure the cut follows the marked line accurately. Also, check for rough or jagged edges and smooth them out for better finishing. Afterward, you can test the edge alignment before assembly; this is particularly important if the cutting is for fitting purposes.
Cutting Tips for Sheet Metal Edging
Achieving clean, precise, and safe cuts in sheet metal edging requires the right techniques and precautions. Below are practical tips to improve efficiency and accuracy while reducing material waste.
Choose the Right Tool for the Job
Different cutting tools work best for specific metal thicknesses and designs:
- Tin snips for thin sheet metal and shortcuts.
- Angle grinders for fast, straight cuts in medium-thickness metal.
- Jigsaws or nibblers for curved or intricate cuts.
- Plasma cutters for thicker sheets with high precision.
Selecting the correct tool prevents unnecessary effort and material damage.
Mark Cutting Lines Clearly and Secure the Metal Sheet Properly
Proper pre-cutting operations are integral to the outcome of the cutting. Even when using the right cutting tool, you must prepare the workpiece before cutting. Use a marker, chalk, or scribe to create a precise cutting guideline. Afterward, you connect the joints with appropriate tools, as a well-defined cutting line ensures fewer mistakes and cleaner results.
Afterward, secure the sheet metal using an appropriate clamp or workholding fixture. A secure workpiece prevents vibrations, improving cut precision and user safety. Use C-clamps or a vice to hold the sheet metal firmly. Ensure the work surface is flat and stable to prevent movement. In addition, ensure enough clearance for tool movement and cutting depth if using a power tool.
Control Cutting Speed and Pressure
Letting the tool do the work even as you cut is best. Even when working with a manual or power tools, your role is to guide the device. Forcing the cut can cause jagged edges or tool damage. Make slow and steady cuts for manual tools (tin snips, hacksaws). Similarly, maintaining a consistent feed rate for power tools (grinders, jigsaws, nibblers) is the way forward.
Reduce Heat Buildup and Warping
Take short breaks between cuts using a tool that generates sparks, like an angle grinder or plasma cutter. However, we must mention that heat is the byproduct of any cutting operation; therefore, you need an effective cooling method to control heat output. For example, you may use compressed air or a damp cloth for heat-sensitive materials. Cooling fluids and lubrications are also effective for modulating heat during machining. In addition, you should use low-speed settings on power tools to minimize excessive heat, as reducing heat prevents metal warping, discoloration, and weakened structural integrity.
Wear Proper Safety Gear
Cutting edge sheet metal creates sharp edges and may involve sparks and flying debris. Therefore, machinists and operators must wear personal protective equipment. They include:
- Safety goggles or a face shield to protect your eyes.
- Heavy-duty gloves to prevent cuts and burns.
- Hearing protection when using loud power tools.
- A dust mask if working in an enclosed space with grinding or cutting debris.
Prioritizing safety minimizes injury risks and ensures a smooth workflow.
Conclusion
Cutting sheet metal edging requires the right tools, techniques, and safety measures to achieve clean and precise results. Whether using tin snips, angle grinders, jigsaws, or nibblers, selecting the appropriate tool ensures efficiency and accuracy. Proper marking, securing, and controlling speed help prevent errors, warping, and rough edges. In addition, deburring the cut edges enhances both safety and appearance. By following best practices and safety precautions, you can confidently cut sheet metal edging for any project in manufacturing, construction, or DIY applications.